Demystifying the Drill: Your Step-by-Step Guide to Dental Implant Surgery
What Are the Dental Implant Procedure Steps? Here's What to Expect
Understanding the dental implant procedure steps can make the whole experience far less intimidating — and help you decide if implants are right for you.
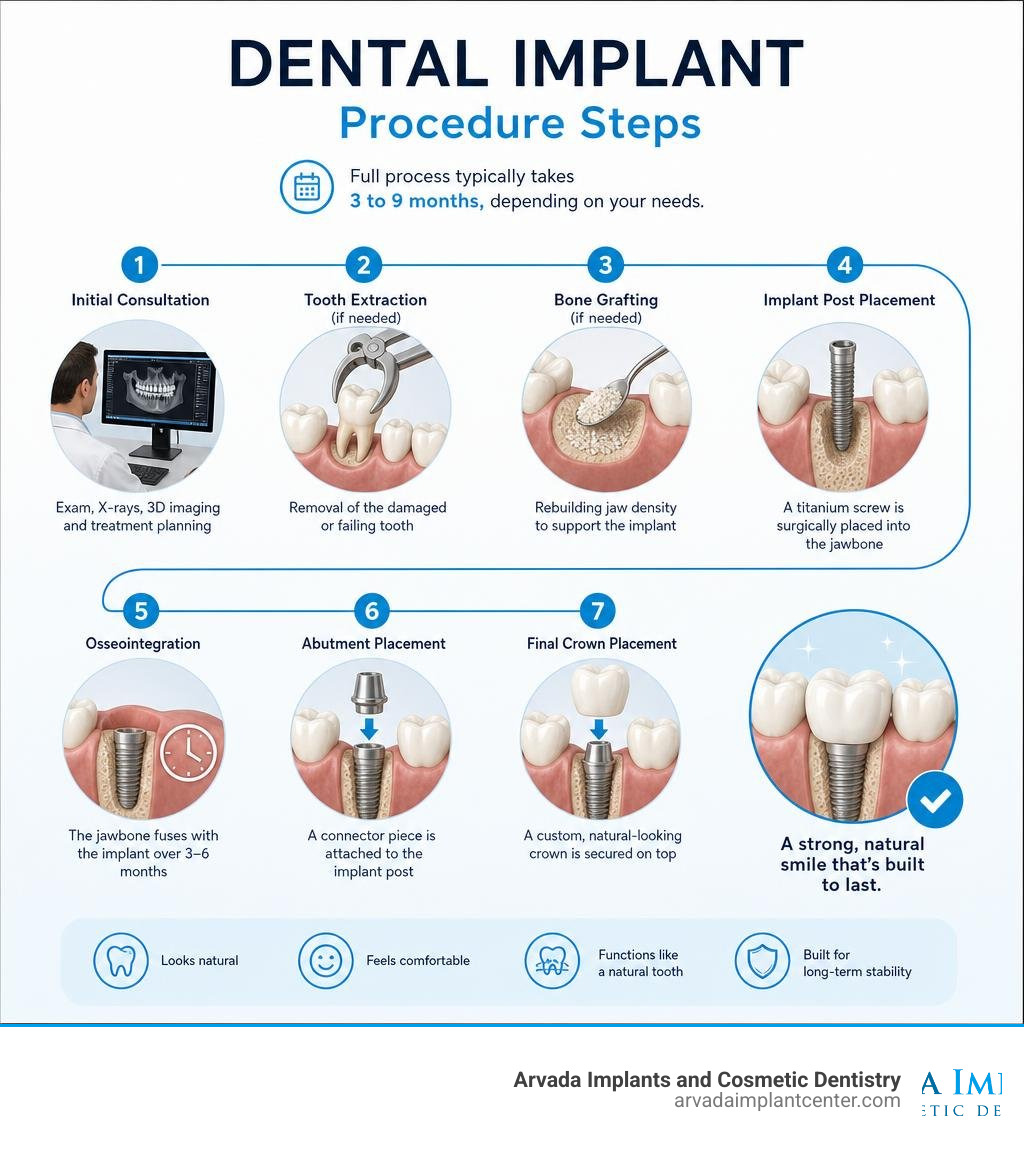
Here is a quick overview of the full process:
Initial consultation — oral exam, X-rays, 3D imaging, and treatment planning
Tooth extraction (if needed) — removal of the damaged or failing tooth
Bone grafting (if needed) — rebuilding jaw density to support the implant
Implant post placement — a titanium screw is surgically placed into the jawbone
Osseointegration — the jawbone fuses with the implant over 3–6 months
Abutment placement — a connector piece is attached to the implant post
Final crown placement — a custom, natural-looking crown is secured on top
The full process typically takes 3 to 9 months, depending on whether you need preparatory work like bone grafting.
About 178 million Americans are missing at least one tooth. Yet many people put off treatment because the process sounds complicated, painful, or expensive. The reality? Most patients are surprised by how manageable it actually is.
Dental implants are titanium posts surgically placed into the jawbone. Over time, the bone grows around the post — a process called osseointegration — creating a stable, permanent foundation for an artificial tooth. The result looks, feels, and functions like a natural tooth.
I'm Dr. Tariq Sawaqed, CEO of Arvada Implants and Cosmetic Dentistry, with over 20 years of experience guiding patients through every dental implant procedure step — from the first 3D scan to final crown placement. In this guide, I'll walk you through exactly what to expect at each stage so you can move forward with confidence.
Candidacy and Pre-Surgical Assessment
Before we ever touch a dental drill, we must ensure your mouth and body are ready for the journey. This initial diagnostic phase is the most critical part of the entire treatment. Without a solid plan, even the most advanced implant can fail.
When you visit us in Arvada, Colorado, we perform a comprehensive assessment to evaluate your candidacy. As of June 2026, the clinical standards for evaluating dental implant placement are more precise than ever. We focus on three core pillars: jawbone density, gum health, and your overall medical history.
To get a complete view of your oral anatomy, we don't just rely on flat, 2D dental X-rays. We utilize advanced Cone Beam Computed Tomography (CBCT) scans. This 3D imaging technology allows us to view your jawbone, nerve pathways, and sinus cavities in high-resolution, three-dimensional space. With this data, we can virtually place your implant on a computer screen before your actual surgery, ensuring unmatched precision.
Our customized treatment planning process maps out every detail of your upcoming procedure. If you want to learn more about the technology and options we offer, you can explore our comprehensive guide on Dental Implants.
Who Is a Good Candidate for Dental Implant Procedure Steps?
An ideal candidate for dental implants is someone in good general and oral health. Specifically, we look for:
Adequate bone volume: There must be enough healthy bone density to anchor the implant post securely.
Healthy gums: Active periodontal (gum) disease is a primary cause of early implant failure. Any gum infections must be fully treated before surgery.
Controlled systemic conditions: Chronic illnesses like diabetes or cardiovascular disease must be well-managed, as they can impact your body’s ability to heal.
Non-smoking status: While smokers can still get implants, smoking significantly slows down the healing process and increases the risk of implant failure. We highly recommend pausing tobacco use during your treatment.
If you have questions about your specific health history, you can Meet Dr. Arlet and our experienced team of specialists to discuss your options in a judgment-free environment.
Prerequisite Procedures: Bone Grafting and Sinus Lifts
What happens if you don't have enough jawbone to support an implant? This is a very common issue. When a tooth is missing, the surrounding bone no longer receives the chewing stimulation it needs, leading to natural bone resorption (melting away).
Fortunately, bone loss doesn't mean you can't get implants. It just means we need to perform a preparatory procedure first:
Socket Preservation: If we are extracting a damaged tooth, we can place bone grafting material directly into the empty socket immediately after extraction to preserve the bone structure.
Bone Grafting: We use specialized bone grafting materials to rebuild the height and width of your jawbone. This material acts as a scaffold, encouraging your body to grow new, healthy bone in its place.
Sinus Lifts (Sinus Augmentation): If you need an implant in your upper back jaw, the sinus cavities may be too close to the bone. A sinus lift gently pushes the sinus membrane upward and places bone graft material underneath to create a safe, thick foundation.
Depending on the extent of the graft, the healing timeline can add 3 to 6 months (and occasionally up to 9 months for major reconstructions) to your overall journey. However, waiting for this bone to mature is non-negotiable for long-term success. For a broader look at how these preliminary stages fit into the larger picture, you can read the Step-by-step dental implant process.
The Core Dental Implant Procedure Steps Explained
Once your jawbone is fully prepared and healthy, we move on to the surgical phase.
Modern dental implant surgery is highly predictable. By utilizing computer-guided surgery software, we translate your 3D CBCT scans into a physical, 3D-printed surgical guide. This guide fits over your teeth during surgery, directing our instruments to the exact depth, angle, and location planned. This minimizes incisions, reduces post-operative discomfort, and ensures the implant is placed in the absolute best position for your future crown.
To ensure your absolute comfort, the entire procedure is performed under local anesthesia. You will feel some mild pressure, but you should not feel any pain. For anxious patients, we also offer customized dental sedation options to keep you completely relaxed. If you are curious about local options, you can read more about getting Dental Implants in Arvada.
Phase 1: Surgical Placement of the Implant Post
With the surgical guide in place, we begin the placement of the implant post:
Creating Access: We make a small, gentle incision in the gum tissue to expose the underlying bone.
Preparing the Osteotomy: Using a precise, incremental sequence of specialized drills, we create a small channel (osteotomy) in the bone. We use sterile saline cooling to protect the bone cells during this process.
Inserting the Titanium Screw: The biocompatible titanium implant post is carefully threaded into the prepared channel.
Measuring Primary Stability: We measure the insertion torque (typically aiming for 35–45 N·cm) or use Implant Stability Quotient (ISQ) devices to ensure the implant is locked tightly into the bone.
Placing the Cap: We place a protective healing cap or cover screw over the top of the implant and gently close the gum tissue with dissolvable sutures.
For those interested in clinical variations across Colorado, you can read about Dental Implant Placement Colorado Springs to see how standard surgical practices align with our advanced protocols.
Phase 2: Osseointegration and Healing
After the implant post is placed, the surgical phase ends, and the biological phase begins. This is where the real "magic" happens: osseointegration.
Osseointegration is the process where your living jawbone cells physically grow into and fuse with the microscopic ridges of the titanium implant surface. This creates a permanent, structural bond that can withstand the immense forces of chewing.
This healing timeline typically takes 3 to 6 months. During this period, you will wear a temporary crown, a cosmetic flipper, or a temporary partial denture so you never have to walk around with an embarrassing gap in your smile. You can dive deeper into the microscopic science of this phase by reading The Dental Implant Procedure: A Step-by-Step Clinical Overview.
Phase 3: Abutment Attachment and Final Crown Placement
Once we confirm that your implant has fully integrated with the bone, it's time to bring your new smile to life:
Exposing the Implant: In a quick, minor follow-up visit, we make a tiny incision to expose the top of the implant and attach a temporary healing collar to shape the surrounding gum tissue.
Taking Impressions: After the gums heal around the collar (usually about two weeks), we take highly accurate digital scans or physical impressions of your mouth.
Custom Lab Creation: We send these scans to our custom laboratory, where technicians craft a bespoke dental crown designed to match the exact shade, shape, and translucency of your neighboring teeth.
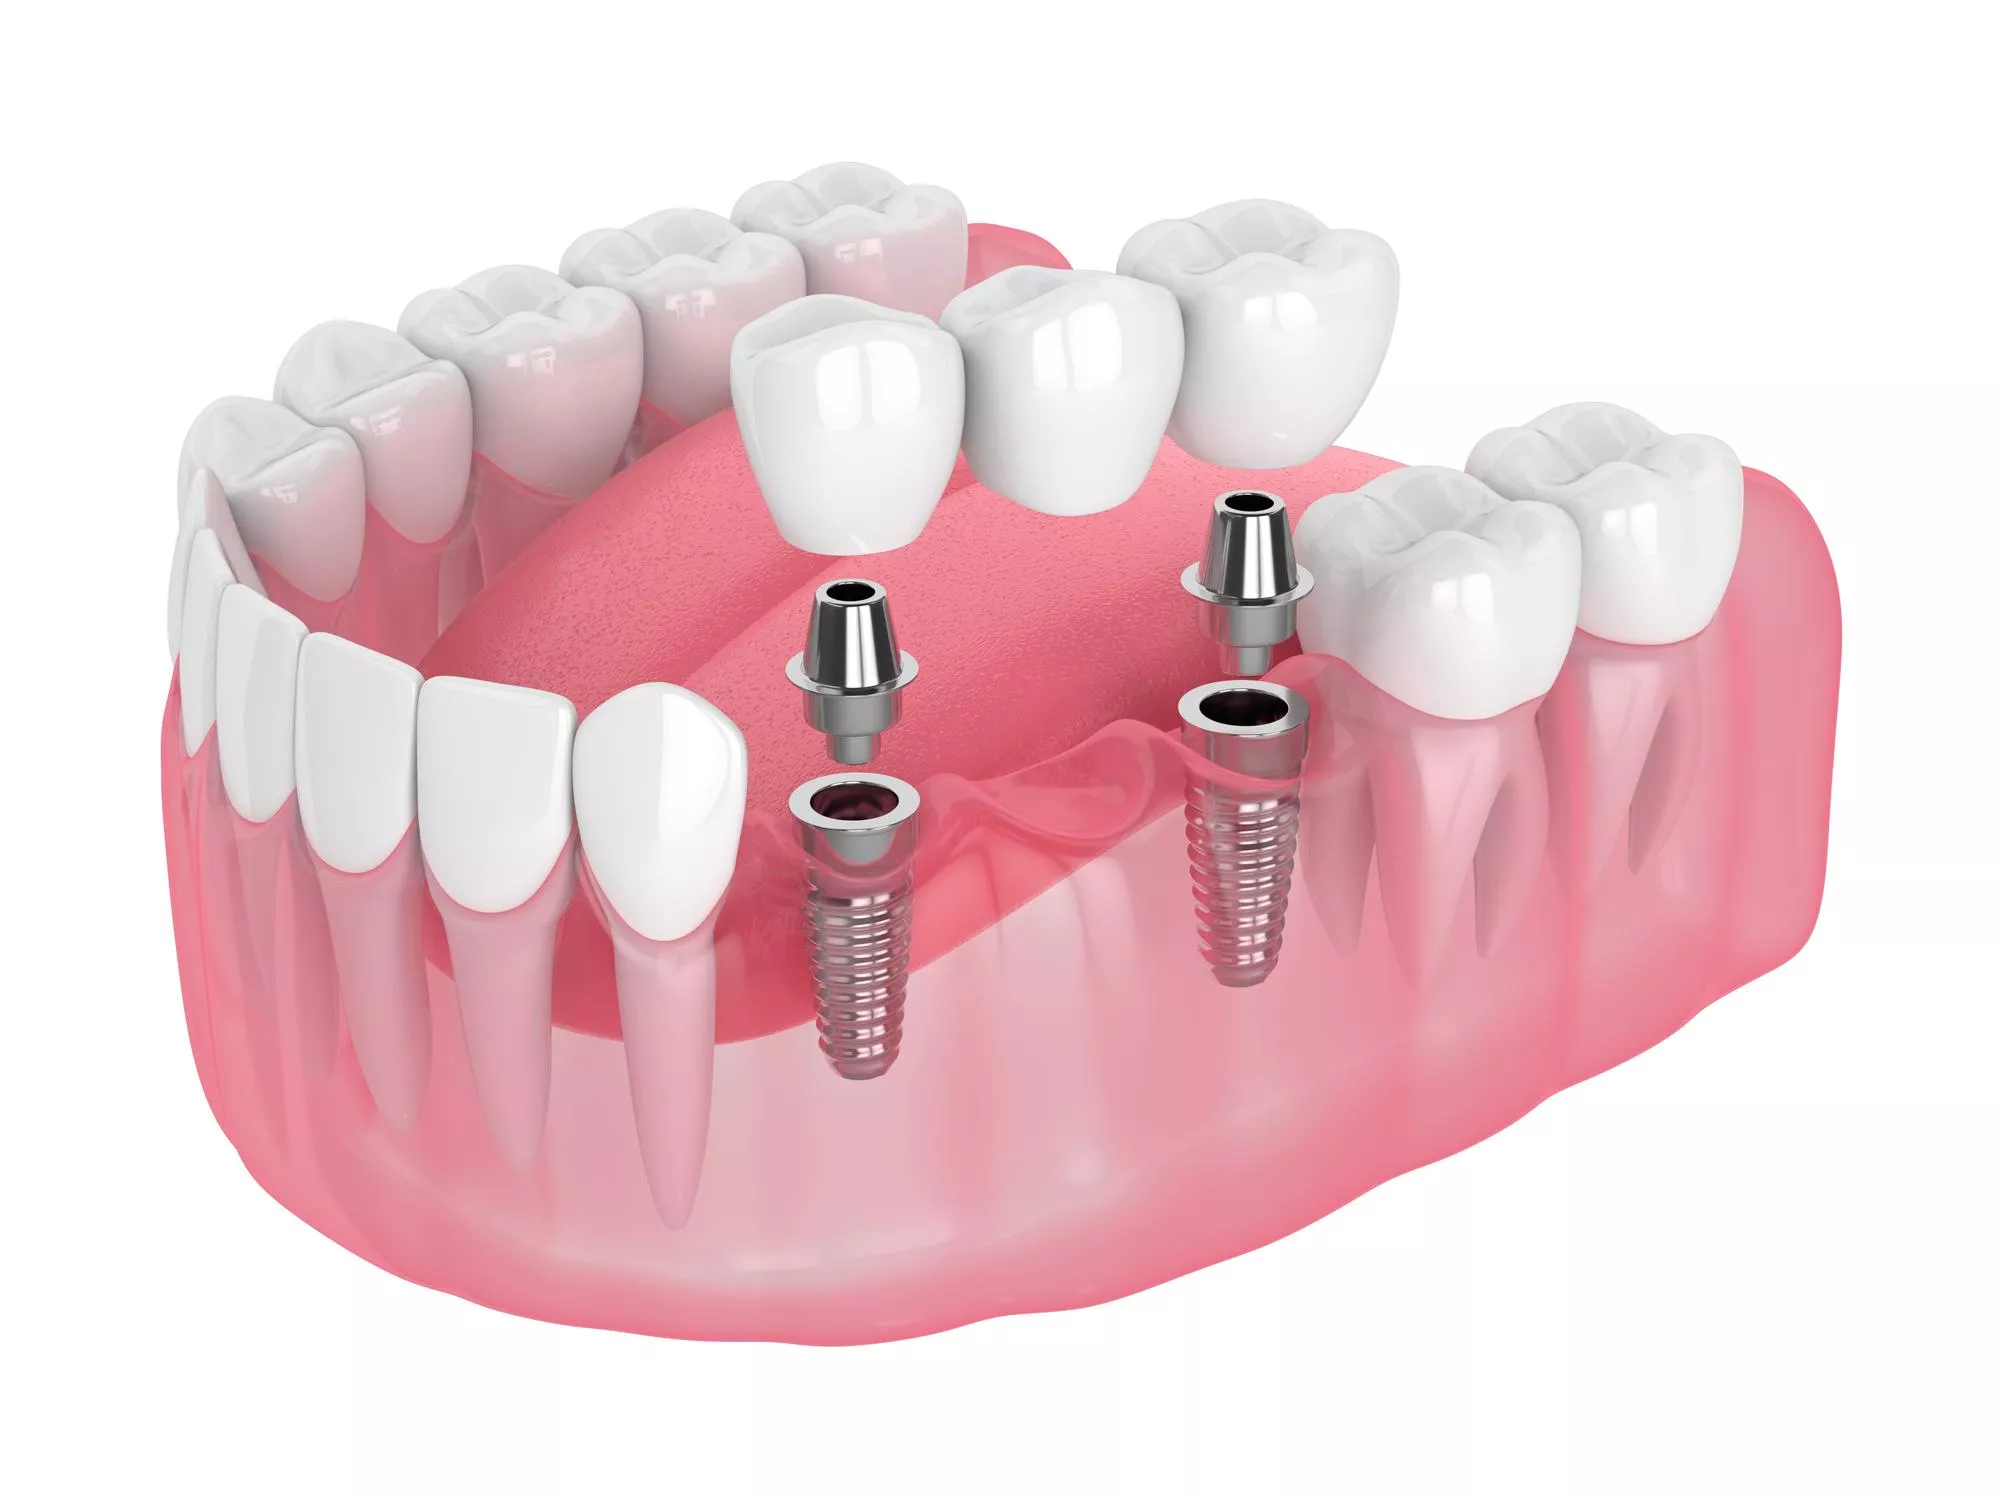
Attaching the Abutment: We secure the abutment — the metal connector piece — to the implant post.
Prosthetic Loading: Finally, we secure your custom crown to the abutment using a tiny screw or dental cement. We meticulously verify your bite alignment to ensure your new tooth feels natural and comfortable when you chew.
Recovery, Aftercare, and Long-Term Maintenance
How you care for your mouth after surgery plays a massive role in how quickly and smoothly you heal.

Managing the First 72 Hours Post-Surgery
Most patients report that the recovery from implant surgery is much easier than they anticipated — often comparable to a routine tooth extraction. The first 48 to 72 hours are when you will experience the peak of mild swelling and minor discomfort.
To manage this initial recovery window:
Apply Cold Compresses: Use ice packs on the outside of your cheek for 15 minutes on, 15 minutes off, during the first 24 hours to minimize swelling.
Stick to a Soft Diet: Enjoy nutritious, soft foods like yogurt, smoothies (no straws!), mashed potatoes, scrambled eggs, and warm soups. Avoid hot, spicy, or crunchy foods.
Take Prescribed Medications: Manage any soreness with over-the-counter pain relievers like ibuprofen or acetaminophen, or take any medications prescribed by our team exactly as directed.
Control Bleeding: Keep light pressure on the surgical site with clean gauze for the first hour. Some pink-tinged saliva is completely normal for the first day.
For a detailed, printable checklist of post-operative care, please review our Implants Home Care Instructions.
Long-Term Care for Dental Implant Procedure Steps Success
While dental implants cannot get cavities, they are still susceptible to gum disease. If plaque and bacteria build up around the implant, it can lead to a condition called peri-implantitis (inflammation and bone loss around the implant).
To ensure your implant lasts a lifetime:
Brush twice daily with a soft-bristled toothbrush and non-abrasive toothpaste.
Floss daily using specialized implant floss or a water flosser to clean hard-to-reach areas.
Attend regular cleanings and checkups every six months so we can monitor the health of your bone and gum tissues.
Comparing Dental Implants to Alternative Treatments
When deciding how to replace missing teeth, it is helpful to see how dental implants stack up against other common restorative options:
Feature Dental Implants Dental Bridges Traditional Dentures Average Lifespan 20+ years to lifetime 10 to 15 years 5 to 10 years Jawbone Preservation Excellent (stimulates bone) None (bone resorbs) None (accelerates bone loss) Impact on Adjacent Teeth None (independent) Requires grinding adjacent teeth Can stress adjacent anchor teeth Chewing Capacity 95%+ (like natural teeth) ~70% to 80% ~20% to 30% Slippage or Movement None (permanently fused) None (fixed cement) Common (uses adhesives)
If you are missing multiple teeth or an entire arch, you may also want to explore All-on-4 Dental Implants, which can replace a full arch of teeth using just four strategically placed implant posts.
Dental Implants vs. Dental Bridges
A traditional dental bridge requires us to grind down the healthy, natural teeth on either side of the gap to act as anchors for the replacement tooth. This permanently compromises healthy tooth structure. Furthermore, because a bridge sits above the gumline, the jawbone underneath will slowly resorb over time. Implants preserve your adjacent teeth and actively stimulate the bone, making them a far healthier long-term choice.
Dental Implants vs. Traditional Dentures
Traditional dentures rest on top of your gums. Because they aren't anchored to the bone, they can slip, click, and slide when you speak or chew, often requiring messy adhesives. Over time, as the jawbone naturally shrinks, dentures will lose their fit and need to be remade. Implants eliminate slippage entirely, restore your full chewing capacity, and preserve your youthful facial structure.
Cost and Insurance Considerations for Dental Implants
We believe in complete transparency. The realistic national range for a complete single-tooth implant (including the post, abutment, and crown) typically falls between $3,000 and $6,000.
Your individual out-of-pocket costs will depend on several variables:
Whether you require preparatory procedures like extractions or bone grafting.
The number of implants you need.
Your dental insurance benefits.
While some insurance plans treat implants as cosmetic, many modern plans will cover portions of the procedure, such as the extraction or the final crown. Our team will work directly with your insurance provider to maximize your benefits and offer flexible financing options to make your treatment affordable.
To learn more about pricing and local options, read our detailed breakdown on the Cost of One Dental Implant or search for budget-friendly care options near you in our guide, Cheap Dental Implants Near Me.
Frequently Asked Questions About Dental Implants
How long does the entire dental implant process take?
For a standard case without bone grafting, the process takes 3 to 6 months from your initial surgery to the placement of your final crown. If you require bone grafting or a sinus lift, the timeline can extend to 6 to 9 months to allow the bone to fully mature.
Is dental implant surgery painful?
No. The surgical placement is performed under highly effective local anesthesia, meaning you will feel pressure but no pain. Most patients report that the post-operative discomfort is mild and easily managed with standard over-the-counter pain relievers for a few days.
What are the main risks and complications of dental implants?
While dental implants have an incredible success rate of 95% to 98%, potential risks include infection at the surgical site, minor nerve damage (causing temporary numbness), or sinus issues if an upper implant extends into the sinus cavity. Choosing an experienced implant specialist and maintaining excellent home care minimizes these risks.
Conclusion
Losing a tooth can take a toll on your confidence, your speech, and your ability to enjoy your favorite foods. But you don't have to live with a incomplete smile.
At Arvada Implants and Cosmetic Dentistry, we specialize in providing affordable, personalized smile restorations. By combining state-of-the-art 3D imaging with custom dental laboratory fabrications, we design unique smiles that look and feel entirely natural.
If you are ready to take the first step toward a healthier, more confident smile, we invite you to schedule a consultation with us today. For More info about cosmetic dentistry services, visit our website and let us help you transform your smile.