A Step-by-Step Guide to Getting Your New Tooth
What to Expect From the Dental Implant Process Step by Step
The dental implant process step by step follows a clear sequence from consultation to final crown — and most patients find it far more manageable than they expected.
Here is a quick overview:
Consultation and 3D imaging — your dentist examines your jaw and creates a treatment plan
Preparatory work — tooth extraction or bone grafting if needed
Implant placement surgery — a titanium post is placed into the jawbone
Osseointegration — the bone fuses with the implant over 3–6 months
Abutment placement — a small connector piece is attached to the post
Final crown attachment — a custom tooth is secured on top
The full process typically takes 3 to 9 months, depending on whether preparatory steps like bone grafting are needed.
If you are one of the roughly 178 million Americans missing at least one tooth, you have probably wondered what replacing it actually involves. The word "surgery" can feel intimidating. So can the timeline. But the reality is that most of the time spent getting a dental implant is simply waiting for your body to heal — not sitting in a dental chair.
Modern implants have a 95–98% success rate at 10 years, making them the most durable tooth replacement option available today. And with proper care, they can last a lifetime.
I'm Dr. Tariq Sawaqed, CEO of Arvada Implants and Cosmetic Dentistry, and with over 20 years of experience guiding patients through the dental implant process step by step, I've helped thousands of people go from anxious about the procedure to thrilled with their results. In this guide, I'll walk you through every phase so you know exactly what to expect.

Who is a Candidate for Dental Implants?
Before diving into the dental implant process step by step, we must first determine if this treatment is the right fit for you. While dental implants are the modern gold standard for replacing missing teeth, they are not a one-size-fits-all solution. Candidacy depends heavily on your oral health, systemic health, and the physical structure of your jaw.
To be a good candidate for dental implants, you generally need:
Healthy Gums: Active periodontal (gum) disease is a leading cause of early implant failure. Any gum issues must be fully treated and managed before we can surgically place implants.
Adequate Bone Density: Because the implant post acts as an artificial tooth root, your jawbone must have enough height, width, and density to securely anchor it.
Good Systemic Health: Conditions that impair your body's natural healing ability — such as uncontrolled diabetes, active cancer treatments, or severe autoimmune disorders — can increase the risk of complications.
A Fully Grown Jawbone: For this reason, we typically do not place dental implants in children or teenagers whose jaws are still developing.
If you are wondering whether you qualify, you can learn More info about dental implant candidacy to see how we evaluate your unique oral anatomy.
Evaluating Your Eligibility for the Dental Implant Process Step by Step
When you visit us in Arvada, CO, we look at several specific lifestyle and anatomical factors to ensure your long-term success.
First and foremost is jawbone volume. When you lose a tooth, the jawbone in that area no longer receives the natural stimulation of chewing. Over time, the bone begins to resorb (melt away). If you have been missing a tooth for years, you may have significant bone loss. Fortunately, this does not automatically disqualify you; it simply means we may need to perform a preparatory bone graft.
Your medical history and lifestyle habits also play a massive role. Smoking, for example, restricts blood flow to the gum tissues and bone, which can significantly slow down or prevent the healing process. While we successfully place implants for patients who smoke, we highly recommend pausing the habit during the critical healing phases.
Finally, let's bust a common myth: age is rarely a disqualifying factor. Whether you are in your 20s or your 80s, as long as you are in reasonable health and have sufficient bone density (or are a candidate for bone grafting), you can safely undergo the implant process.
Comparing Implants to Dentures and Bridges
When deciding how to replace missing teeth, patients often compare dental implants to traditional options like dental bridges and removable dentures.
Dental Bridges: A bridge is a fixed prosthetic that "bridges" the gap left by a missing tooth. However, to support a bridge, we must grind down the healthy neighboring teeth to serve as anchors. This compromises otherwise healthy tooth structure. Additionally, bridges do not stop jawbone loss beneath the missing tooth and typically need replacement every 5 to 10 years.
Dentures: While modern dentures are far more comfortable than those of past generations, they still sit on top of the gums. They can slip, click, restrict your ability to eat hard foods, and require messy adhesives. Because they do not stimulate the jawbone, bone loss continues, which alters your facial structure over time (causing a sunken appearance).
Dental Implants: Implants are the only option that replaces the entire tooth structure, from the root up. They fuse directly with your bone, preventing bone loss, preserving your natural facial shape, and leaving adjacent teeth completely untouched.
Feature Dental Implants Traditional Bridges Removable Dentures Average Lifespan 20+ years to a lifetime 5 to 10 years 5 to 10 years Bone Preservation Excellent (prevents bone loss) None (bone continues to shrink) None (accelerates bone loss) Impact on Adjacent Teeth None (completely independent) Requires grinding down adjacent teeth Can put stress on remaining teeth Chewing Efficiency 99% (acts like natural teeth) Moderate (60-70%) Low (20-30%) Stability Permanent (does not slip or move) Fixed (but can decay underneath) Removable (susceptible to slipping)
For patients dealing with Multiple Missing Teeth, comparing these options early helps prevent advanced bone loss and saves on long-term dental costs.
The Dental Implant Process Step by Step
Getting a dental implant is a multi-step journey that combines surgical precision with the art of restorative dentistry. It is typically performed as an outpatient procedure under local anesthesia or sedation, meaning you go home the same day.

Understanding the Dental Implant Process Step by Step Timeline
The most important thing to understand about the implant timeline is that it cannot be rushed. The biological process of your bone fusing to the titanium post requires time. While some specialized cases allow for "same-day" temporary teeth, traditional implant cases span several months to ensure the strongest possible foundation.
For a deeper dive into how this timeline looks across different clinical scenarios, you can read this Step-by-step dental implant process guide.
Phase 1: Consultation, 3D Imaging, and Treatment Planning
Every successful journey begins with a map. In implant dentistry, that map is created during your initial consultation.
During this visit, we do not just look at your teeth with a dental mirror. We perform a comprehensive oral examination and utilize a state-of-the-art CBCT (Cone Beam Computed Tomography) scan. Unlike flat 2D X-rays, a CBCT scan provides a highly detailed, 3D digital model of your jawbone, nerve pathways, and sinus cavities.
This advanced technology allows us to:
Measure the exact height and width of your jawbone.
Locate vital structures (like the mandibular nerve or sinus floor) to avoid them during surgery.
Virtually place the implant on a computer screen before we ever touch your mouth.
Our commitment to safety and predictability relies heavily on these digital diagnostics. You can learn More info about our advanced technology to see how we plan your surgery with sub-millimeter precision. During this planning phase, you will also meet our experienced clinical team, including Dr. Tariq Sawaqed and Dr. Arlet, to discuss your goals and choose the best sedation options for your comfort.
Phase 2: Preparatory Procedures (Extractions and Bone Grafting)
If you have a tooth that is severely damaged, decayed, or fractured, the first clinical step is a gentle tooth extraction. Whenever possible, we perform "socket preservation" at the time of extraction. This involves placing a small amount of bone grafting material directly into the empty socket to prevent the surrounding bone from collapsing.
If you have been missing a tooth for a long time, your jawbone may be too thin or soft to support an implant. In this scenario, we perform a bone graft or guided bone regeneration (GBR). This procedure uses natural or synthetic bone mineral to stimulate your body to build new, strong bone in the target area.
If we are placing an implant in your upper back jaw, we may also need to perform a sinus lift. The maxillary sinuses sit right above your upper teeth. If the bone there is too thin, we gently lift the sinus membrane upward and place bone graft material beneath it to create enough vertical space for the implant post.
Depending on the extent of the grafting, we may need to let the graft heal for 3 to 6 months before placing the implant, though minor grafts can often be done on the same day as implant placement.
For detailed recovery tips after these prep steps, check out More info about tooth extraction aftercare and read More info about guided bone regeneration to understand how we rebuild your smile's foundation.
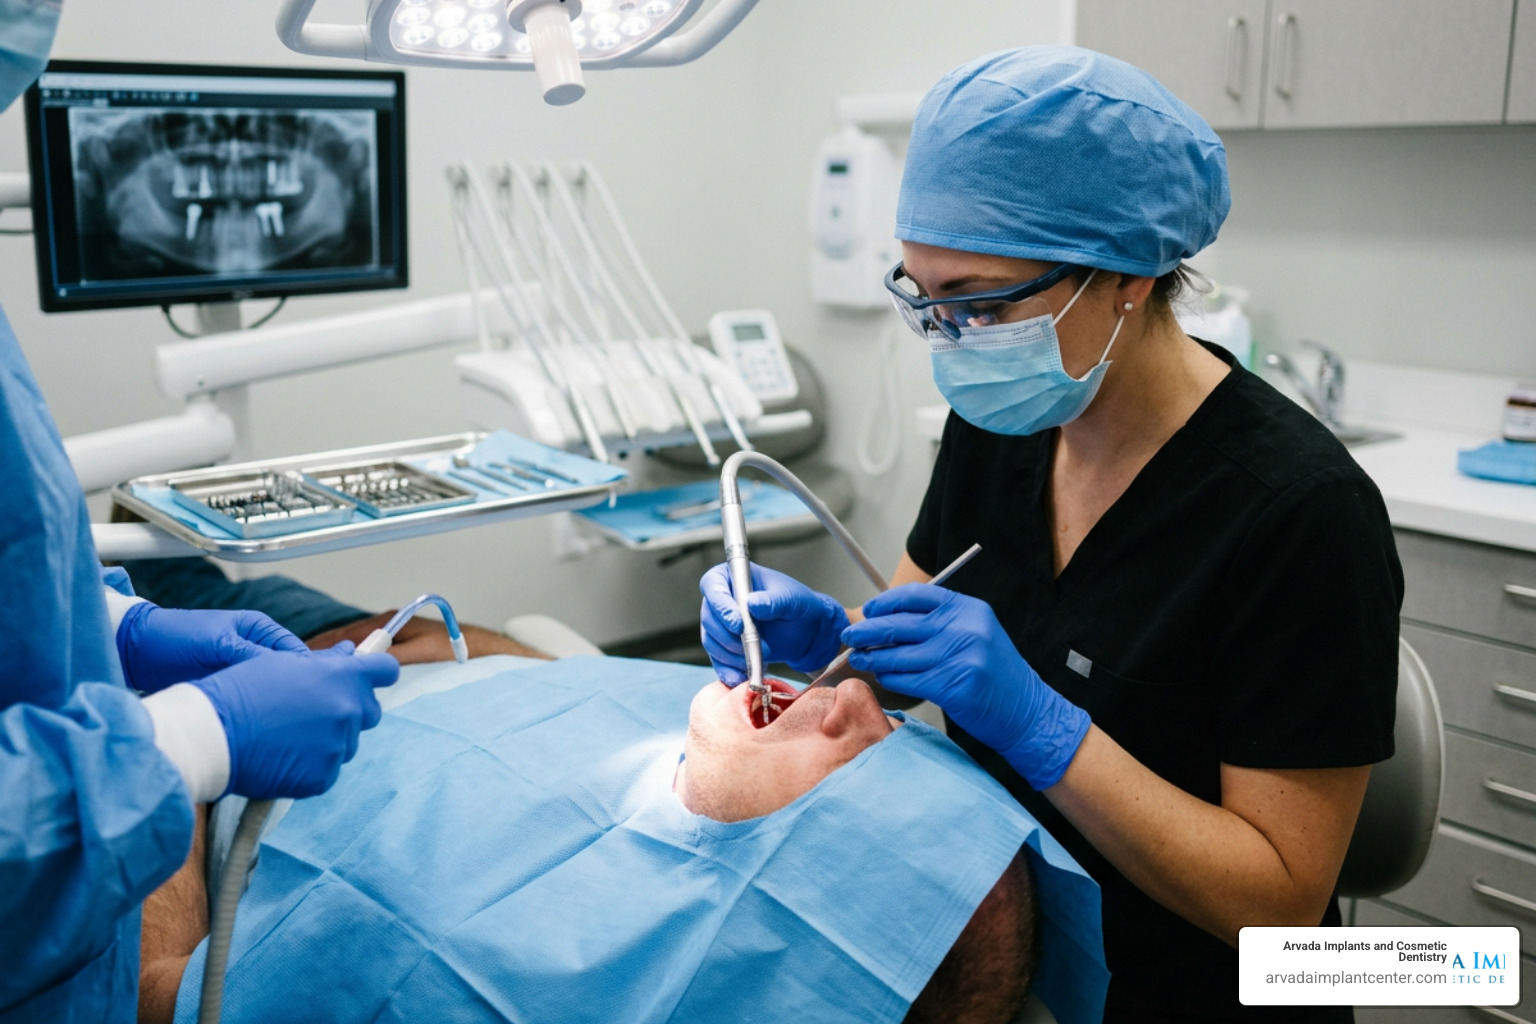
Phase 3: Surgical Placement of the Titanium Post
On the day of your implant surgery, your comfort is our absolute priority. We offer several anesthesia options, ranging from local numbing to comfortable IV sedation, so you won't feel a thing.
Once you are completely comfortable, we follow these surgical steps:
Incision: We make a small, precise incision in the gum tissue to expose the underlying bone.
Preparation: Using a highly specialized, low-speed drill and computer-guided surgical templates, we create a precise channel in the bone. Because bone itself has no pain-sensing nerve endings, this part of the procedure is surprisingly comfortable — most patients describe it as feeling like a gentle vibration.
Placement: We gently thread the biocompatible titanium implant post into the prepared channel.
Closure: We place a protective healing cap over the implant and close the gum tissue with a few small, dissolvable sutures.
For a single implant, this entire surgical process typically takes just 45 to 90 minutes.
Phase 4: Osseointegration and the Healing Phase
Once the implant is placed, the magic of biology begins. Over the next 3 to 6 months, your jawbone will undergo a process called osseointegration.
Titanium is highly biocompatible, meaning the human body does not recognize it as a foreign object. Instead, your bone cells will actually grow directly onto the microscopic ridges of the implant post, fusing with it to create an incredibly strong, permanent bond. This bond is what allows your implant to withstand the immense forces of natural chewing.
During this healing phase, you will not be left toothless! We can provide a temporary crown, a dental "flipper" (a temporary removable tooth), or a temporary bridge so you can smile and speak with complete confidence while your implant integrates.
To optimize your body's healing capacity during this critical window, nutrition is key. You can find More info about recovery foods to keep your body fueled and comfortable.
Phase 5: Abutment Placement and Final Crown Attachment
Once we verify that osseointegration is complete (often using a gentle "tap test" or digital imaging), it is time for the final restoration phase.
First, we perform a minor, quick procedure to attach the abutment. The abutment is a small connector piece that screws into the implant post and sits just above the gum line, acting as the anchor for your new tooth.

After the gums heal around the abutment for a week or two, we take highly accurate digital impressions of your mouth. At Arvada Implants and Cosmetic Dentistry, we use these digital scans to craft a beautiful, custom zirconia crown designed specifically for your bite, facial features, and tooth shade.
Once your custom crown is ready, we secure it onto the abutment, check your bite, make any final microscopic adjustments, and send you on your way with a gorgeous, fully functional new tooth! If you are replacing just one tooth, read More info about single tooth implants to see how this final step seamlessly restores your smile.
Recovery, Aftercare, and Long-Term Maintenance
Recovering from dental implant surgery is generally much easier than patients expect. Most people report that the post-operative discomfort is milder than a standard tooth extraction and can be easily managed with over-the-counter pain relievers like ibuprofen or acetaminophen.
For the first 24 to 48 hours after surgery, we recommend:
Resting: Avoid strenuous physical exercise, which can increase bleeding and swelling.
Cold Compresses: Apply an ice pack to your cheek in 20-minute intervals to minimize swelling.
Soft Foods: Stick to a soft-food diet (smoothies, yogurt, mashed potatoes, scrambled eggs) and avoid hot, carbonated, or highly spicy foods.
No Straws: Avoid using straws, as the suction can disturb the surgical site.
To help you recover as quickly and comfortably as possible, we have compiled comprehensive guides. Be sure to look at More info about sleeping with an elevated head to reduce morning swelling, and review our detailed More info about home care instructions to keep your recovery on track.
Long-Term Care to Ensure Lifetime Success
While dental implants cannot get cavities, the gum tissue and bone surrounding them can still get infected if oral hygiene is neglected. This condition, known as peri-implantitis, is the leading cause of late implant failure.
To ensure your implants last a lifetime, follow these simple maintenance habits:
Brush and Floss Daily: Brush at least twice a day with a soft-bristled toothbrush and floss daily. You can use specialized implant floss or a water flosser to easily clean hard-to-reach areas around the implant crown.
Avoid Hard Objects: Do not chew on ice, hard candies, or use your teeth as tools to open packages. While zirconia is incredibly strong, extreme forces can still chip or crack the porcelain crown.
Visit Us Regularly: Schedule professional cleanings and dental exams every six months. During these visits, we check the stability of your implant, evaluate the health of the surrounding bone, and perform specialized cleanings to keep the area pristine.
Frequently Asked Questions about Tooth Replacement
How long does the entire dental implant process take?
The entire process typically takes between 3 to 9 months from your initial consultation to the placement of your final crown. The exact timeline depends on whether you need preparatory procedures like tooth extractions or bone grafting. If bone grafting is required, it adds about 3 to 6 months of healing time to the front end of the process.
Is the dental implant procedure painful?
No, you should not feel any pain during the surgical placement of the implant. We utilize highly effective local anesthetics to completely numb the area, and we offer customized sedation options to keep you relaxed and comfortable. Most patients are pleasantly surprised by how manageable the recovery is, describing the post-op feeling as a mild soreness that peaks around 48 to 72 hours and resolves within a week.
What are the risks or potential complications of implant surgery?
Though rare, potential risks of dental implant surgery include infection at the surgical site, minor nerve damage (causing temporary numbness in the lip or chin), sinus issues (if an upper implant extends into the sinus cavity), or implant failure (where the bone fails to fuse with the post). We minimize these risks by using advanced 3D CBCT imaging and guided surgical techniques to plan every step with extreme precision.
Conclusion
The dental implant process step by step is a highly predictable, scientifically proven journey that does far more than just fill a gap in your mouth — it restores your ability to eat your favorite foods, speak clearly, smile with confidence, and preserve your long-term jawbone health.
At Arvada Implants and Cosmetic Dentistry, we specialize in providing personalized, affordable implant treatments. Because we utilize our own custom lab creations, we can design a unique, natural-looking smile that perfectly fits your face and budget. Our warm, highly experienced team is here to guide you through every single step of the process in a comfortable, judgment-free environment.
Ready to take the first step toward a beautiful, permanent smile? Schedule your consultation today and let us help you reclaim your confidence!