Dental Implant Recovery Timeline: How Long Does It Actually Take?
What to Expect During Dental Implant Recovery: A Clear Timeline
The dental implant recovery timeline is something almost every implant patient wants to understand before committing to surgery — and for good reason. Knowing what's ahead helps you plan your schedule, manage discomfort, and recognize whether your healing is on track.
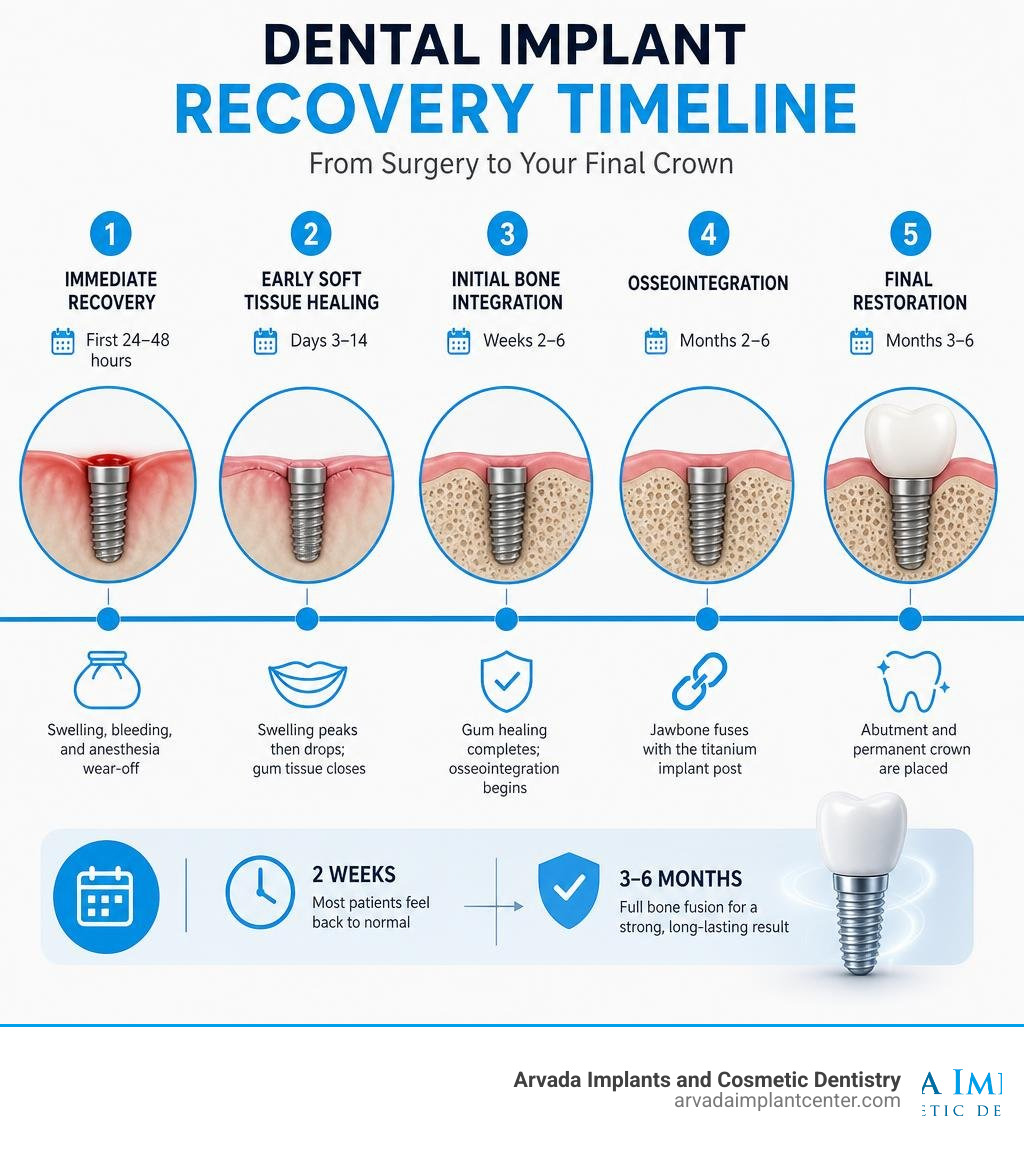
Here's a quick overview of the full timeline:
Phase Timeframe What's Happening Immediate recovery First 24–48 hours Swelling, bleeding, and anesthesia wear-off Early soft tissue healing Days 3–14 Swelling peaks then drops; gum tissue closes Initial bone integration Weeks 2–6 Gum healing completes; osseointegration begins Osseointegration Months 2–6 Jawbone fuses with the titanium implant post Final restoration Months 3–6 Abutment and permanent crown are placed
The short answer: Most patients feel back to normal within 2 weeks. But full bone fusion — the process that makes your implant permanently stable — takes 3 to 6 months before a permanent crown can be placed.
The good news? That longer healing phase is mostly silent. You won't feel it happening. Life goes on, and the biology takes care of itself beneath the surface.
I'm Dr. Tariq Sawaqed, founder of Arvada Implants and Cosmetic Dentistry, and with over 20 years of clinical experience placing implants, I've guided thousands of patients through every stage of the dental implant recovery timeline. In the sections below, I'll walk you through exactly what to expect — day by day, week by week, and month by month.
The Immediate Post-Op Phase: First 24 to 48 Hours
The first 24 to 48 hours after your surgery are the most critical for setting the stage for a smooth recovery. During this period, your primary goals are to control bleeding, manage early discomfort, and protect the newly forming blood clot at the surgical site.
When you first leave our Arvada office, your mouth will still be numb from the local anesthesia. This numbness typically wears off within 2 to 4 hours. It is highly recommended to take your first dose of pain medication before the anesthesia completely wears off. This proactive approach helps you stay ahead of the pain curve rather than trying to chase it once it becomes uncomfortable.
Minor bleeding or oozing is completely normal during the first 24 hours. We will provide you with sterile gauze packs to place over the surgical site. You should bite down on these gauze packs with firm, gentle pressure for 30 to 45 minutes at a time. If bleeding persists, replace the gauze with a fresh piece.
To ensure you are fully prepared for this initial phase, we recommend reviewing our comprehensive implants home care instructions and, if you had a tooth removed during the same appointment, our guidelines on tooth extraction aftercare.
Managing Pain, Swelling, and Bleeding
Swelling is a natural part of the body's inflammatory response to surgery. What surprises many patients is that swelling does not peak immediately; instead, it typically reaches its maximum on day three (48 to 72 hours post-surgery).
To minimize swelling, apply an ice pack to the side of your face in 20-minute intervals (20 minutes on, 20 minutes off) during the first 48 hours. After 48 hours, you can transition to warm compresses to promote blood circulation and ease muscle stiffness.
For pain management, alternating over-the-counter ibuprofen (Advil/Motrin) with acetaminophen (Tylenol) is highly effective. In fact, clinical data shows that about 60% of dental implant patients never feel the need to fill a narcotic prescription when following a scheduled regimen of over-the-counter pain relievers. Always consult with us before starting any medication schedule to ensure it aligns with your medical history.
For a deeper dive into what to expect immediately after your procedure, you can read this dental implant recovery guide.
Sleep and Rest Strategies for Early Healing
Rest is your body's most powerful healing tool. For the first 24 to 48 hours, limit yourself to quiet, low-energy activities. Avoid bending over, lifting heavy objects, or engaging in strenuous physical activity, as these actions elevate your blood pressure and can cause the surgical site to start bleeding again.
When it comes to bedtime, your sleeping position matters. Keeping your head elevated at a 45-degree angle using extra pillows is highly recommended. Utilizing proper elevated head sleeping techniques reduces blood pressure in the head and neck area, which significantly limits throbbing, swelling, and overnight bleeding.
Lastly, protect the surgical site by avoiding any suction in your mouth. This means absolutely no using straws, no spitting forcefully, and no smoking. The suction created by these actions can dislodge the blood clot, leading to a painful condition known as dry socket or delaying your overall healing. If you also had a tooth pulled as part of your dental implant preparation, make sure to closely follow our tooth extraction home care instructions to protect the healing socket.
Your Week-by-Week Dental Implant Recovery Timeline
The journey from a missing tooth to a fully restored, beautiful smile is a multi-stage process. While the surgical placement of the titanium post takes only 1 to 2 hours per implant, the biological timeline spans several months.
Understanding the distinct healing phases of both the soft tissue (gums) and the hard tissue (bone) helps demystify the process. If you are receiving a full-arch restoration, you can learn more about how this timeline differs by reading about the all-on-4 recovery time. For single or multi-tooth replacements, the standard dental implant procedure steps will guide your journey.
Week 1: Initial Milestones in Your Dental Implant Recovery Timeline
By the end of the first week, you will have crossed the most challenging milestones of your dental implant recovery timeline.
Days 1 to 3: Swelling peaks and then begins to drop sharply. Discomfort transitions from a moderate ache to a mild, manageable tenderness.
Day 2: You can safely begin gentle warm salt water rinses (1/2 teaspoon of salt in a glass of warm water) 3 to 4 times a day, especially after meals. Do not rinse vigorously; simply let the warm water bathe the surgical area and let it roll out of your mouth over the sink.
Days 4 to 7: Suture care becomes important. If we used non-dissolving stitches, they will remain secure and clean. If we used dissolvable sutures, they may begin to loosen and fall out naturally.
Hygiene: You can resume brushing your other teeth normally, but use an ultra-soft-bristled toothbrush to clean very gently around the surgical site. Avoid touching the implant area directly with your tongue or fingers.
For more details on navigating these first critical seven days, check out this guide on navigating dental implant recovery.
Weeks 2 to 4: Transitioning Diet and Activity
During weeks two through four, you will experience a dramatic shift. The visible, soft-tissue healing of your gums is typically complete within approximately 14 days.
At your 10-to-14-day follow-up appointment in our Arvada office, we will perform a suture removal if necessary and evaluate the health of your gum tissue. As the swelling completely disappears and your gums heal, you can begin transitioning your diet from liquids and purees to slightly firmer, semi-soft foods. However, you must continue to chew on the opposite side of your mouth to avoid placing direct pressure on the healing implant.
Most patients can safely return to light exercise, such as walking or light cycling, by the second week. However, listen to your body; if you feel throbbing at the implant site during physical exertion, stop and rest. By the end of week four, the gum tissue will have closed completely over the implant site, providing a protective barrier for the bone work beginning underneath. You can read more about this transition in a standard healing timeline after dental implant surgery.
Months 2 to 6: Osseointegration and the Dental Implant Recovery Timeline
While you may feel 100% normal on the outside, the most important phase of your dental implant recovery timeline is happening silently beneath your gums. This phase is called osseointegration — the biological process where your jawbone fuses directly with the biocompatible titanium post.
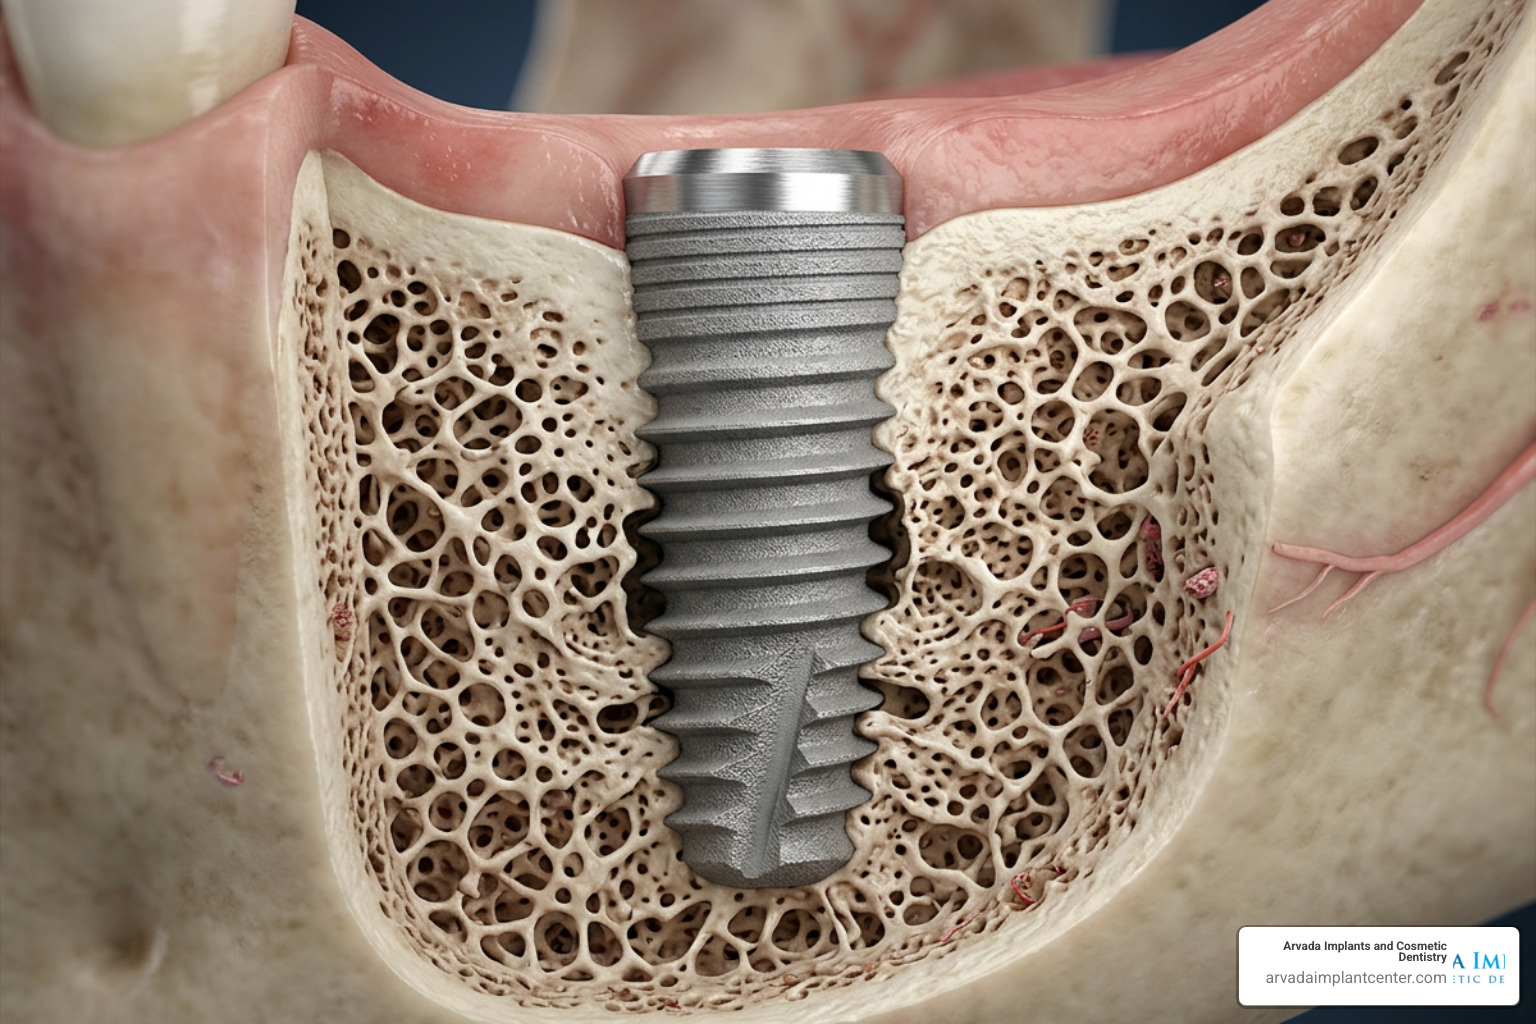
This "silent integration" takes time because bone cells heal much slower than gum tissue:
Lower Jaw Implants: Typically require 3 to 4 months to fully integrate because the lower jawbone (mandible) is naturally denser.
Upper Jaw Implants: Typically require 4 to 6 months to integrate because the upper jawbone (maxilla) is softer and less dense.
Stability Check: Around the third or fourth month, we will take digital X-rays to verify that the bone has successfully grown around the microscopic ridges of the titanium post, creating a foundation that is actually stronger than a natural tooth root.
To learn more about the surgical and biological phases of this period, refer to standard clinical guidelines on the dental implant post-op recovery timeline.
Dietary Guidelines and Long-Term Care for Implant Success
What you eat — and how you clean your mouth — directly influences how quickly and successfully your dental implant heals. Rushing back to hard foods or neglecting your oral hygiene can compromise the delicate integration process.

Stage-by-Stage Nutrition for Optimal Recovery
To support your body's healing mechanisms, focus on staying hydrated and eating nutrient-dense, room-temperature foods. Avoid very hot liquids, spicy dishes, and foods with small seeds or husks (like popcorn or strawberries) that can easily lodge under your gum tissue. For inspiration, explore our list of the best recovery foods.
Here is a stage-by-stage guide to your recovery diet:
First 24 to 48 Hours (Liquid/Ultra-Soft Diet): Focus on smooth, cool, or room-temperature options. Excellent choices include protein shakes, Greek yogurt, smooth applesauce, bone broth, and fruit smoothies (eaten with a spoon, not a straw).
Days 3 to 7 (Soft, Non-Chew Foods): You can introduce soft foods that require minimal to no chewing. Enjoy mashed potatoes, oatmeal, scrambled eggs, mashed avocados, and well-cooked, pureed vegetable soups.
Weeks 2 to 4 (Semi-Soft Foods): As your gum tissue heals, expand your diet to include soft pasta, flaky fish, tofu, cottage cheese, and soft-cooked vegetables. Remember to continue chewing on the opposite side of your mouth.
Months 2 to 6 (Gradual Return to Normal): You can eat a relatively normal diet, but continue to avoid biting directly into hard, crunchy, or sticky foods (like raw carrots, whole apples, or hard candies) with the area of the mouth containing the healing implant.
Daily Hygiene and Professional Maintenance
Once your gums have fully closed, maintaining a spotless oral environment is the single best way to prevent long-term complications.
To keep your healing implant and surrounding teeth in perfect health:
Daily Brushing: Brush your teeth at least twice a day using a soft-bristled toothbrush. Angle the brush at 45 degrees toward the gumline to gently sweep away plaque.
Interdental Brushes: Use plastic-coated interdental brushes to clean between your teeth and around the implant abutment. Avoid metal-wire brushes, as they can scratch the titanium surface of the implant.
Water Flossers: Once cleared by our team (usually around week 4), a water flosser used on a medium pressure setting is incredibly effective at flushing out bacteria and food debris from hard-to-reach pockets around your implant.
Professional Cleanings: Visit us every 3 to 6 months for professional cleanings. Our specialized hygienists use ultrasonic instruments designed specifically for implants to keep your smile pristine.
Recognizing Successful Healing vs. Potential Complications
While dental implants boast an incredible clinical success rate of up to 98% over a five-year period, it is still vital to understand what normal healing looks like versus the warning signs of potential complications.
Symptom Normal Healing (What to Expect) Potential Complication (Red Flag!) Pain Mild to moderate; steadily improves after day 3 Severe, throbbing pain that worsens over time Swelling Peaks on day 3, then decreases daily Swelling that suddenly increases after day 4 Bleeding Minor oozing/pink saliva for 24–48 hours Active, continuous bright red bleeding Implant Feel Feels stable, though gums may be sensitive The implant post or healing cap feels loose Fever Slight elevation (under 100°F) on day 1 Fever over 101°F or persistent chills Discharge Clear fluid or minor blood-tinged saliva Pus or a foul-tasting discharge from the site
Normal Healing Milestones
As you progress through your recovery, you should notice a steady, daily improvement. Your swelling will peak on day three and then drop off sharply. Your gum tissue will transition from a deep red to a healthy, light pink.
By the second week, you should experience a gradual return to your normal routine with little to no daily discomfort. The implant should feel completely stable and unnoticeable in your jaw.
Red Flags: When to Contact Your Dentist
While rare, complications such as early implant failure or peri-implantitis (an inflammatory disease that affects the gums and bone around an implant) can occur if bacteria invade the surgical site.
Please call our Arvada office immediately if you experience any of the following:
Severe Pain: Pain that is not controlled by your medication or that suddenly intensifies after a few days of improvement.
Persistent Bleeding: Active bleeding that does not slow down even after biting on fresh gauze for several hours.
Fever or Chills: A fever exceeding 101°F, which can be an early sign of a developing infection.
Loose Implant: Any feeling of movement or mobility in the implant post or the healing cap.
Numbness: Persistent numbness or a tingling sensation in your lip, chin, tongue, or cheek that lasts longer than 24 hours after surgery.
Frequently Asked Questions About Dental Implant Recovery
How long does it take for the bone to fully integrate with the implant?
The biological process of osseointegration typically takes between 3 to 6 months. The exact duration depends heavily on the quality and density of your jawbone, your overall systemic health, and the location of the implant. Lower jaw implants generally integrate faster (3 to 4 months) than upper jaw implants (5 to 6 months) due to natural differences in bone density.
When can I return to my normal diet and exercise routine?
Most patients can resume light physical activities (like walking) within 3 to 5 days, and return to their regular gym routines or strenuous exercise after 7 to 10 days. As for your diet, you should stick to soft foods for the first 2 weeks to protect the soft tissue. You can gradually reintroduce firmer foods as your comfort allows, but you must avoid chewing directly on the implant site until the final crown is placed.
How does a bone graft affect my overall recovery timeline?
If you have insufficient bone density and require a bone graft, it will extend your overall timeline. A bone graft is typically performed either prior to or during your implant placement. If done beforehand, the graft requires 3 to 6 months of healing to create a solid bone foundation before the titanium post can be placed. This means the entire journey from your initial consultation to your final crown may span 8 to 14 months, but this step is absolutely essential for ensuring the long-term stability of your implant.
Conclusion
The dental implant recovery timeline is a journey that requires patience, but the long-term reward is a beautiful, fully functional smile that can last a lifetime. By following post-operative care instructions, maintaining excellent oral hygiene, and attending your scheduled follow-up visits, you play an active role in the success of your treatment.
At Arvada Implants and Cosmetic Dentistry, we pride ourselves on providing affordable, highly personalized treatments. We utilize state-of-the-art technology and custom lab creations to craft unique smiles that perfectly match your natural aesthetics.
If you are ready to restore your smile and want to discuss a personalized recovery timeline tailored to your unique needs, we invite you to explore our cosmetic dentistry services and schedule your consultation with us today!